This section presents two basic techniques of using AspectJ, one each from the two fundamental ways of capturing crosscutting concerns: with dynamic join points and advice, and with static introduction. Advice changes an application's behavior. Introduction changes both an application's behavior and its structure.
The first example, Join Points and thisJoinPoint, is about gathering and using information about the join point that has triggered some advice. The second example, Roles and Views Using Introduction, concerns changing an existing class hierarchy.
(The code for this example is in InstallDir/examples/tjp.)
A join point is some point in the execution of a program together with a view into the execution context when that point occurs. Join points are picked out by pointcuts. When a join point is reached, before, after or around advice on that join point may be run.
When dealing with pointcuts that pick out join points of specific method calls, field gets, or the like, the advice will know exactly what kind of join point it is executing under. It might even have access to context given by its pointcut. Here, for example, since the only join points reached will be calls of a certain method, we can get the target and one of the args of the method directly.
before(Point p, int x): target(p)
                     && args(x)
                     && call(void setX(int)) {
    if (!p.assertX(x)) {
        System.out.println("Illegal value for x"); return;
    }
}
But sometimes the join point is not so clear. For instance, suppose a complex application is being debugged, and one would like to know when any method in some class is being executed. Then, the pointcut
pointcut execsInProblemClass(): within(ProblemClass)
                             && execution(* *(..));
will select all join points where a method defined within the class ProblemClass is being executed. But advice executes when a particular join point is matched, and so the question, "Which join point was matched?" naturally arises.
Information about the join point that was matched is available to advice through the special variable thisJoinPoint, of type org.aspectj.lang.JoinPoint. This class provides methods that return
- the kind of join point that was matched
- the source location of the current join point
- normal, short and long string representations of the current join point
- the actual argument(s) to the method or field selected by the current join point
- the signature of the method or field selected by the current join point
- the target object
- the currently executing object
- a reference to the static portion of the object representing the current join point. This is also available through the special variable thisJoinPointStaticPart.
The class tjp.Demo in tjp/Demo.java defines two methods foo and bar with different parameter lists and return types. Both are called, with suitable arguments, by Demo's go method which was invoked from within its main method.
public class Demo {

    static Demo d;

    public static void main(String[] args){
        new Demo().go();
    }

    void go(){
        d = new Demo();
        d.foo(1,d);
        System.out.println(d.bar(new Integer(3)));
    }

    void foo(int i, Object o){
        System.out.println("Demo.foo(" + i + ", " + o + ")\n");
    }


    String bar (Integer j){
        System.out.println("Demo.bar(" + j + ")\n");
        return "Demo.bar(" + j  + ")";
    }

}
This aspect uses around advice to intercept the execution of methods foo and bar in Demo, and prints out information garnered from thisJoinPoint to the console.
The pointcut goCut is defined as cflow(this(Demo)) && execution(void go()) so that only executions made in the control flow of Demo.go are intercepted. The control flow from the method go includes the execution of go itself, so the definition of the around advice includes !execution(* go()) to exclude it from the set of executions advised.
The name of the method and that method's defining class are available as parts of the Signature, found using the method getSignature of either thisJoinPoint or thisJoinPointStaticPart.
aspect GetInfo {

   static final void println(String s){ System.out.println(s); }

   pointcut goCut(): cflow(this(Demo) && execution(void go()));

   pointcut demoExecs(): within(Demo) && execution(* *(..));

   Object around(): demoExecs() && !execution(* go()) && goCut() {
      println("Intercepted message: " +
          thisJoinPointStaticPart.getSignature().getName());
      println("in class: " +
          thisJoinPointStaticPart.getSignature().getDeclaringType().getName());
      printParameters(thisJoinPoint);
      println("Running original method: \n" );
      Object result = proceed();
      println("  result: " + result );
      return result;
   }

   static private void printParameters(JoinPoint jp) {
      println("Arguments: " );
      Object[] args = jp.getArgs();
      String[] names = ((CodeSignature)jp.getSignature()).getParameterNames();
      Class[] types = ((CodeSignature)jp.getSignature()).getParameterTypes();
      for (int i = 0; i < args.length; i++) {
         println("  "  + i + ". " + names[i] +
             " : " +            types[i].getName() +
             " = " +            args[i]);
      }
   }
}
The static portions of the parameter details, the name and types of the parameters, can be accessed through the CodeSignature associated with the join point. All execution join points have code signatures, so the cast to CodeSignature cannot fail.
The dynamic portions of the parameter details, the actual values of the parameters, are accessed directly from the execution join point object.
(The code for this example is in InstallDir/examples/introduction.)
Like advice, pieces of introduction are members of an aspect. They define new members that act as if they were defined on another class. Unlike advice, introduction affects not only the behavior of the application, but also the structural relationship between an application's classes.
This is crucial: Affecting the class structure of an application at makes these modifications available to other components of the application.
Introduction modifies a class by adding or changing
and by making the class
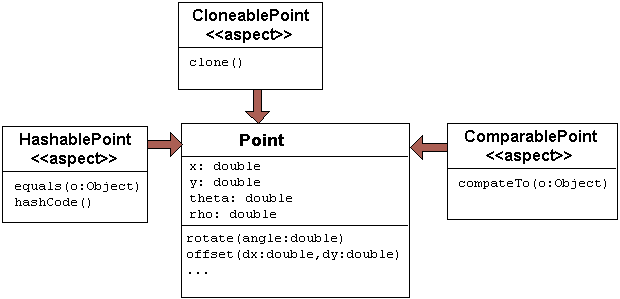
This example provides three illustrations of the use of introduction to encapsulate roles or views of a class. The class we will be introducing into, Point, is a simple class with rectangular and polar coordinates. Our introduction will make the class Point, in turn, cloneable, hashable, and comparable. These facilities are provided by introduction forms without having to modify the class Point.
The class Point defines geometric points whose interface includes polar and rectangular coordinates, plus some simple operations to relocate points. Point's implementation has attributes for both its polar and rectangular coordinates, plus flags to indicate which currently reflect the position of the point. Some operations cause the polar coordinates to be updated from the rectangular, and some have the opposite effect. This implementation, which is in intended to give the minimum number of conversions between coordinate systems, has the property that not all the attributes stored in a Point object are necessary to give a canonical representation such as might be used for storing, comparing, cloning or making hash codes from points. Thus the aspects, though simple, are not totally trivial.
The diagram below gives an overview of the aspects and their interaction with the class Point.
This first example demonstrates the introduction of a interface (Cloneable) and a method (clone) into the class Point. In Java, all objects inherit the method clone from the class Object, but an object is not cloneable unless its class also implements the interface Cloneable. In addition, classes frequently have requirements over and above the simple bit-for-bit copying that Object.clone does. In our case, we want to update a Point's coordinate systems before we actually clone the Point. So we have to override Object.clone with a new method that does what we want.
The CloneablePoint aspect uses the declare parents form to introduce the interface Cloneable into the class Point. It then defines a method, Point.clone, which overrides the method clone that was inherited from Object. Point.clone updates the Point's coordinate systems before invoking its superclass' clone method.
public aspect CloneablePoint {

   declare parents: Point implements Cloneable;

   public Object Point.clone() throws CloneNotSupportedException {
      // we choose to bring all fields up to date before cloning.
      makeRectangular();
      makePolar();
      return super.clone();
   }

   public static void main(String[] args){
      Point p1 = new Point();
      Point p2 = null;

      p1.setPolar(Math.PI, 1.0);
      try {
         p2 = (Point)p1.clone();
      } catch (CloneNotSupportedException e) {}
      System.out.println("p1 =" + p1 );
      System.out.println("p2 =" + p2 );

      p1.rotate(Math.PI / -2);
      System.out.println("p1 =" + p1 );
      System.out.println("p2 =" + p2 );
   }
}
Note that since aspects define types just as classes define types, we can define a main method that is invocable from the command line to use as a test method.
This second example introduces another interface and method into the class Point.
The interface Comparable defines the single method compareTo which can be use to define a natural ordering relation among the objects of a class that implement it.
The aspect ComparablePoint introduces implements Comparable into Point along with a compareTo method that can be used to compare Points. A Point p1 is said to be less than another Point p2 if p1 is closer to the origin.
public aspect ComparablePoint {

   declare parents: Point implements Comparable;

   public int Point.compareTo(Object o) {
      return (int) (this.getRho() - ((Point)o).getRho());
   }

   public static void main(String[] args){
      Point p1 = new Point();
      Point p2 = new Point();

      System.out.println("p1 =?= p2 :" + p1.compareTo(p2));

      p1.setRectangular(2,5);
      p2.setRectangular(2,5);
      System.out.println("p1 =?= p2 :" + p1.compareTo(p2));

      p2.setRectangular(3,6);
      System.out.println("p1 =?= p2 :" + p1.compareTo(p2));

      p1.setPolar(Math.PI, 4);
      p2.setPolar(Math.PI, 4);
      System.out.println("p1 =?= p2 :" + p1.compareTo(p2));

      p1.rotate(Math.PI / 4.0);
      System.out.println("p1 =?= p2 :" + p1.compareTo(p2));

      p1.offset(1,1);
      System.out.println("p1 =?= p2 :" + p1.compareTo(p2));
   }
}The third aspect overrides two previously defined methods to give to Point the hashing behavior we want.
The method Object.hashCode returns an unique integer, suitable for use as a hash table key. Different implementations are allowed return different integers, but must return distinct integers for distinct objects, and the same integer for objects that test equal. But since the default implementation of Object.equal returns true only when two objects are identical, we need to redefine both equals and hashCode to work correctly with objects of type Point. For example, we want two Point objects to test equal when they have the same x and y values, or the same rho and theta values, not just when they refer to the same object. We do this by overriding the methods equals and hashCode in the class Point.
The class HashablePoint introduces the methods hashCode and equals into the class Point. These methods use Point's rectangular coordinates to generate a hash code and to test for equality. The x and y coordinates are obtained using the appropriate get methods, which ensure the rectangular coordinates are up-to-date before returning their values.
public aspect HashablePoint {

   public int Point.hashCode() {
      return (int) (getX() + getY() % Integer.MAX_VALUE);
   }

   public boolean Point.equals(Object o) {
      if (o == this) { return true; }
      if (!(o instanceof Point)) { return false; }
      Point other = (Point)o;
      return (getX() == other.getX()) && (getY() == other.getY());
   }

   public static void main(String[] args) {
      Hashtable h = new Hashtable();
      Point p1 = new Point();

      p1.setRectangular(10, 10);
      Point p2 = new Point();

      p2.setRectangular(10, 10);

      System.out.println("p1 = " + p1);
      System.out.println("p2 = " + p2);
      System.out.println("p1.hashCode() = " + p1.hashCode());
      System.out.println("p2.hashCode() = " + p2.hashCode());

      h.put(p1, "P1");
      System.out.println("Got: " + h.get(p2));
   }
}
Again, we supply a main method in the aspect for testing.