User’s guide
…or IDT’s list of opinionated howtos
This section seeks to provide users of the Apuana infrastructure with practical knowledge, tips and tricks and example commands.
Running your code
SLURM commands guide
Basic Usage
The SLURM documentation provides extensive information on the available commands to query the cluster status or submit jobs.
Below are some basic examples of how to use SLURM.
Submitting jobs
Batch job
In order to submit a batch job, you have to create a script containing the main command(s) you would like to execute on the allocated resources/nodes.
#!/bin/bash
#SBATCH --job-name=test
#SBATCH --output=job_output.txt
#SBATCH --error=job_error.txt
#SBATCH --ntasks=1
#SBATCH --time=10:00
#SBATCH --mem=100Gb

module load python/3.5
python my_script.py
Your job script is then submitted to SLURM with sbatch (ref.)
$ sbatch job_script
sbatch: Submitted batch job 4323674
The working directory of the job will be the one where your executed sbatch.
Dica
Slurm directives can be specified on the command line alongside sbatch or
inside the job script with a line starting with #SBATCH.
Interactive job
Workload managers usually run batch jobs to avoid having to watch its
progression and let the scheduler run it as soon as resources are available. If
you want to get access to a shell while leveraging cluster resources, you can
submit an interactive jobs where the main executable is a shell with the
srun/salloc (srun/salloc) commands
salloc
Will start an interactive job on the first node available with the default
resources set in SLURM (1 task/1 CPU). srun accepts the same arguments as
sbatch with the exception that the environment is not passed.
Dica
To pass your current environment to an interactive job, add
--preserve-env to srun.
salloc can also be used and is mostly a wrapper around srun if provided
without more info but it gives more flexibility if for example you want to get
an allocation on multiple nodes.
Job submission arguments
In order to accurately select the resources for your job, several arguments are available. The most important ones are:
Argument |
Description |
|---|---|
-n, –ntasks=<number> |
The number of task in your script, usually =1 |
-c, –cpus-per-task=<ncpus> |
The number of cores for each task |
-t, –time=<time> |
Time requested for your job |
–mem=<size[units]> |
Memory requested for all your tasks |
–gres=<list> |
Select generic resources such as GPUs for your job: |
Dica
Always consider requesting the adequate amount of resources to improve the scheduling of your job (small jobs always run first).
Checking job status
To display jobs currently in queue, use squeue and to get only your jobs type
$ squeue -u $USER
JOBID   USER          NAME    ST  START_TIME         TIME NODES CPUS TRES_PER_NMIN_MEM NODELIST (REASON) COMMENT
133     my_username   myjob   R   2019-03-28T18:33   0:50     1    2        N/A  7000M node1 (None) (null)
Nota
The maximum number of jobs able to be submitted to the system per user is 1000 (MaxSubmitJobs=1000) at any given time from the given association. If this limit is reached, new submission requests will be denied until existing jobs in this association complete.
Removing a job
To cancel your job simply use scancel
scancel 4323674
Partitioning
Since we don’t have many GPUs on the cluster, resources must be shared as fairly
as possible. The --partition=/-p flag of SLURM allows you to set the
priority you need for a job. Each job assigned with a priority can preempt jobs
with a lower priority: unkillable > main > long. Once preempted, your job is
killed without notice and is automatically re-queued on the same partition until
resources are available. (To leverage a different preemption mechanism, see the
Handling preemption)
Flag |
Max Resource Usage |
Max Time |
Note |
|---|---|---|---|
--partition=unkillable |
6 CPUs, mem=32G, 1 GPU |
2 days |
|
--partition=unkillable-cpu |
2 CPUs, mem=16G |
2 days |
CPU-only jobs |
--partition=short-unkillable |
24 CPUs, mem=128G, 4 GPUs |
3 hours (!) |
Large but short jobs |
--partition=main |
8 CPUs, mem=48G, 2 GPUs |
5 days |
|
--partition=main-cpu |
8 CPUs, mem=64G |
5 days |
CPU-only jobs |
--partition=long |
no limit of resources |
7 days |
|
--partition=long-cpu |
no limit of resources |
7 days |
CPU-only jobs |
Aviso
Historically, before the 2022 introduction of CPU-only nodes (e.g. the
cn-fseries), CPU jobs ran side-by-side with the GPU jobs on GPU nodes. To prevent them obstructing any GPU job, they were always lowest-priority and preemptible. This was implemented by automatically assigning them to one of the now-obsolete partitionscpu_jobs,cpu_jobs_loworcpu_jobs_low-grace.
- Do not use these partition names anymore. Prefer the
*-cpupartition names defined above.
For backwards-compatibility purposes, the legacy partition names are translated to their effective equivalent
long-cpu, but they will eventually be removed entirely.
Nota
- As a convenience, should you request the
unkillable,mainorlong partition for a CPU-only job, the partition will be translated to its
-cpuequivalent automatically.
For instance, to request an unkillable job with 1 GPU, 4 CPUs, 10G of RAM and 12h of computation do:
sbatch --gres=gpu:1 -c 4 --mem=10G -t 12:00:00 --partition=unkillable <job.sh>
You can also make it an interactive job using salloc:
salloc --gres=gpu:1 -c 4 --mem=10G -t 12:00:00 --partition=unkillable
The Mila cluster has many different types of nodes/GPUs. To request a specific type of node/GPU, you can add specific feature requirements to your job submission command.
To access those special nodes you need to request them explicitly by adding the
flag --constraint=<name>. The full list of nodes in the Mila Cluster can be
accessed Node profile description.
Example:
To request a machine with 2 GPUs using NVLink, you can use
sbatch -c 4 --gres=gpu:2 --constraint=nvlink
Feature |
Particularities |
|---|---|
12GB/16GB/24GB/32GB/48GB |
Request a specific amount of GPU memory |
volta/turing/ampere |
Request a specific GPU architecture |
nvlink |
Machine with GPUs using the NVLink interconnect technology |
Information on partitions/nodes
sinfo (ref.) provides most of the
information about available nodes and partitions/queues to submit jobs to.
Partitions are a group of nodes usually sharing similar features. On a partition, some job limits can be applied which will override those asked for a job (i.e. max time, max CPUs, etc…)
To display available partitions, simply use
$ sinfo
PARTITION AVAIL TIMELIMIT NODES STATE  NODELIST
batch     up     infinite     2 alloc  node[1,3,5-9]
batch     up     infinite     6 idle   node[10-15]
cpu       up     infinite     6 idle   cpu_node[1-15]
gpu       up     infinite     6 idle   gpu_node[1-15]
To display available nodes and their status, you can use
$ sinfo -N -l
NODELIST    NODES PARTITION STATE  CPUS MEMORY TMP_DISK WEIGHT FEATURES REASON
node[1,3,5-9]   2 batch     allocated 2    246    16000     0  (null)   (null)
node[2,4]       2 batch     drain     2    246    16000     0  (null)   (null)
node[10-15]     6 batch     idle      2    246    16000     0  (null)   (null)
...
And to get statistics on a job running or terminated, use sacct with some of
the fields you want to display
$ sacct --format=User,JobID,Jobname,partition,state,time,start,end,elapsed,nnodes,ncpus,nodelist,workdir -u $USER
    User        JobID    JobName  Partition      State  Timelimit               Start                 End    Elapsed   NNodes      NCPUS        NodeList              WorkDir
--------- ------------ ---------- ---------- ---------- ---------- ------------------- ------------------- ---------- -------- ---------- --------------- --------------------
my_usern+ 2398         run_extra+      batch    RUNNING 130-05:00+ 2019-03-27T18:33:43             Unknown 1-01:07:54        1         16 node9           /home/mila/my_usern+
my_usern+ 2399         run_extra+      batch    RUNNING 130-05:00+ 2019-03-26T08:51:38             Unknown 2-10:49:59        1         16 node9           /home/mila/my_usern+
Or to get the list of all your previous jobs, use the --start=YYYY-MM-DD flag. You can check sacct(1) for further information about additional time formats.
sacct -u $USER --start=2019-01-01
scontrol (ref.) can be used to
provide specific information on a job (currently running or recently terminated)
$ scontrol show job 43123
JobId=43123 JobName=python_script.py
UserId=my_username(1500000111) GroupId=student(1500000000) MCS_label=N/A
Priority=645895 Nice=0 Account=my_username QOS=normal
JobState=RUNNING Reason=None Dependency=(null)
Requeue=1 Restarts=3 BatchFlag=1 Reboot=0 ExitCode=0:0
RunTime=2-10:41:57 TimeLimit=130-05:00:00 TimeMin=N/A
SubmitTime=2019-03-26T08:47:17 EligibleTime=2019-03-26T08:49:18
AccrueTime=2019-03-26T08:49:18
StartTime=2019-03-26T08:51:38 EndTime=2019-08-03T13:51:38 Deadline=N/A
PreemptTime=None SuspendTime=None SecsPreSuspend=0
LastSchedEval=2019-03-26T08:49:18
Partition=slurm_partition AllocNode:Sid=login-node-1:14586
ReqNodeList=(null) ExcNodeList=(null)
NodeList=node2
BatchHost=node2
NumNodes=1 NumCPUs=16 NumTasks=1 CPUs/Task=16 ReqB:S:C:T=0:0:*:*
TRES=cpu=16,mem=32000M,node=1,billing=3
Socks/Node=* NtasksPerN:B:S:C=1:0:*:* CoreSpec=*
MinCPUsNode=16 MinMemoryNode=32000M MinTmpDiskNode=0
Features=(null) DelayBoot=00:00:00
OverSubscribe=OK Contiguous=0 Licenses=(null) Network=(null)
WorkDir=/home/mila/my_username
StdErr=/home/mila/my_username/slurm-43123.out
StdIn=/dev/null
StdOut=/home/mila/my_username/slurm-43123.out
Power=
Or more info on a node and its resources
$ scontrol show node node9
NodeName=node9 Arch=x86_64 CoresPerSocket=4
CPUAlloc=16 CPUTot=16 CPULoad=1.38
AvailableFeatures=(null)
ActiveFeatures=(null)
Gres=(null)
NodeAddr=10.252.232.4 NodeHostName=mila20684000000 Port=0 Version=18.08
OS=Linux 4.15.0-1036 #38-Ubuntu SMP Fri Dec 7 02:47:47 UTC 2018
RealMemory=32000 AllocMem=32000 FreeMem=23262 Sockets=2 Boards=1
State=ALLOCATED+CLOUD ThreadsPerCore=2 TmpDisk=0 Weight=1 Owner=N/A MCS_label=N/A
Partitions=slurm_partition
BootTime=2019-03-26T08:50:01 SlurmdStartTime=2019-03-26T08:51:15
CfgTRES=cpu=16,mem=32000M,billing=3
AllocTRES=cpu=16,mem=32000M
CapWatts=n/a
CurrentWatts=0 LowestJoules=0 ConsumedJoules=0
ExtSensorsJoules=n/s ExtSensorsWatts=0 ExtSensorsTemp=n/s
Useful Commands
- salloc
Get an interactive job and give you a shell. (ssh like) CPU only
- salloc --gres=gpu:1 -c 2 --mem=12000
Get an interactive job with one GPU, 2 CPUs and 12000 MB RAM
- sbatch
start a batch job (same options as salloc)
- sattach --pty <jobid>.0
Re-attach a dropped interactive job
- sinfo
status of all nodes
- sinfo -Ogres:27,nodelist,features -tidle,mix,alloc
List GPU type and FEATURES that you can request
- savail
(Custom) List available gpu
- scancel <jobid>
Cancel a job
- squeue
summary status of all active jobs
- squeue -u $USER
summary status of all YOUR active jobs
- squeue -j <jobid>
summary status of a specific job
- squeue -Ojobid,name,username,partition,state,timeused,nodelist,gres,tres
status of all jobs including requested resources (see the SLURM squeue doc for all output options)
- scontrol show job <jobid>
Detailed status of a running job
- sacct -j <job_id> -o NodeList
Get the node where a finished job ran
- sacct -u $USER -S <start_time> -E <stop_time>
Find info about old jobs
- sacct -oJobID,JobName,User,Partition,Node,State
List of current and recent jobs
Special GPU requirements
Specific GPU architecture and memory can be easily requested through the
--gres flag by using either
--gres=gpu:architecture:number--gres=gpu:memory:number--gres=gpu:model:number
Example:
To request 1 GPU with at least 16GB of memory use
sbatch -c 4 --gres=gpu:16gb:1
The full list of GPU and their features can be accessed here.
Example script
Here is a sbatch script that follows good practices on the Mila cluster:
#!/bin/bash

#SBATCH --partition=unkillable                           # Ask for unkillable job
#SBATCH --cpus-per-task=2                                # Ask for 2 CPUs
#SBATCH --gres=gpu:1                                     # Ask for 1 GPU
#SBATCH --mem=10G                                        # Ask for 10 GB of RAM
#SBATCH --time=3:00:00                                   # The job will run for 3 hours
#SBATCH -o /network/scratch/<u>/<username>/slurm-%j.out  # Write the log on scratch

# 1. Load the required modules
module --quiet load anaconda/3

# 2. Load your environment
conda activate "<env_name>"

# 3. Copy your dataset on the compute node
cp /network/datasets/<dataset> $SLURM_TMPDIR

# 4. Launch your job, tell it to save the model in $SLURM_TMPDIR
#    and look for the dataset into $SLURM_TMPDIR
python main.py --path $SLURM_TMPDIR --data_path $SLURM_TMPDIR

# 5. Copy whatever you want to save on $SCRATCH
cp $SLURM_TMPDIR/<to_save> /network/scratch/<u>/<username>/
Portability concerns and solutions
When working on a software project, it is important to be aware of all the software and libraries the project relies on and to list them explicitly and under a version control system in such a way that they can easily be installed and made available on different systems. The upsides are significant:
Easily install and run on the cluster
Ease of collaboration
Better reproducibility
To achieve this, try to always keep in mind the following aspects:
- Versions: For each dependency, make sure you have some record of the
specific version you are using during development. That way, in the future, you will be able to reproduce the original environment which you know to be compatible. Indeed, the more time passes, the more likely it is that newer versions of some dependency have breaking changes. The
pip freezecommand can create such a record for Python dependencies.
- Isolation: Ideally, each of your software projects should be isolated from
the others. What this means is that updating the environment for project A
- should not update the environment for project B. That way, you can freely
install and upgrade software and libraries for the former without worrying about breaking the latter (which you might not notice until weeks later, the next time you work on project B!) Isolation can be achieved using Python Virtual environments and containers.
Managing your environments
Virtual environments
A virtual environment in Python is a local, isolated environment in which you can install or uninstall Python packages without interfering with the global environment (or other virtual environments). It usually lives in a directory (location varies depending on whether you use venv, conda or poetry). In order to use a virtual environment, you have to activate it. Activating an environment essentially sets environment variables in your shell so that:
pythonpoints to the right Python version for that environment (differentvirtual environments can use different versions of Python!)
pythonlooks for packages in the virtual environmentpip installinstalls packages into the virtual environmentAny shell commands installed via
pip installare made available
To run experiments within a virtual environment, you can simply activate it
in the script given to sbatch.
Pip/Virtualenv
Pip is the preferred package manager for Python and each cluster provides several Python versions through the associated module which comes with pip. In order to install new packages, you will first have to create a personal space for them to be stored. The preferred solution (as it is the preferred solution on Digital Research Alliance of Canada clusters) is to use virtual environments.
First, load the Python module you want to use:
module load python/3.8
Then, create a virtual environment in your home directory:
python -m venv $HOME/<env>
Where <env> is the name of your environment. Finally, activate the environment:
source $HOME/<env>/bin/activate
You can now install any Python package you wish using the pip command, e.g.
pytorch:
pip install torch torchvision
Or Tensorflow:
pip install tensorflow-gpu
Conda
Another solution for Python is to use miniconda or anaconda which are also available through the module
command: (the use of Conda is not recommended for Digital Research Alliance of
Canada clusters due to the availability of custom-built packages for pip)
$ module load miniconda/3
[=== Module miniconda/3 loaded ===]
To enable conda environment functions, first use:
To create an environment (see here for details) using a specific Python version, you may write:
conda create -n <env> python=3.9
Where <env> is the name of your environment. You can now activate it by doing:
conda activate <env>
You are now ready to install any Python package you want in this environment. For instance, to install PyTorch, you can find the Conda command of any version you want on pytorch’s website, e.g:
conda install pytorch torchvision cudatoolkit=10.0 -c pytorch
If you make a lot of environments and install/uninstall a lot of packages, it can be good to periodically clean up Conda’s cache:
conda clean --all
Using Modules
A lot of software, such as Python and Conda, is already compiled and available on
the cluster through the module command and its sub-commands. In particular,
if you wish to use Python 3.7 you can simply do:
module load python/3.7
The module command
For a list of available modules, simply use:
$ module avail
--------------------------------------------------------------------------------------------------------------- Global Aliases ---------------------------------------------------------------------------------------------------------------
    cuda/10.0 -> cudatoolkit/10.0    cuda/9.2      -> cudatoolkit/9.2                                 pytorch/1.4.1       -> python/3.7/cuda/10.2/cudnn/7.6/pytorch/1.4.1    tensorflow/1.15 -> python/3.7/tensorflow/1.15
    cuda/10.1 -> cudatoolkit/10.1    mujoco-py     -> python/3.7/mujoco-py/2.0                        pytorch/1.5.0       -> python/3.7/cuda/10.2/cudnn/7.6/pytorch/1.5.0    tensorflow/2.2  -> python/3.7/tensorflow/2.2
    cuda/10.2 -> cudatoolkit/10.2    mujoco-py/2.0 -> python/3.7/mujoco-py/2.0                        pytorch/1.5.1       -> python/3.7/cuda/10.2/cudnn/7.6/pytorch/1.5.1
    cuda/11.0 -> cudatoolkit/11.0    pytorch       -> python/3.7/cuda/10.2/cudnn/7.6/pytorch/1.5.1    tensorflow          -> python/3.7/tensorflow/2.2
    cuda/9.0  -> cudatoolkit/9.0     pytorch/1.4.0 -> python/3.7/cuda/10.2/cudnn/7.6/pytorch/1.4.0    tensorflow-cpu/1.15 -> python/3.7/tensorflow/1.15

--------------------------------------------------------------------------------------------------- /cvmfs/config.mila.quebec/modules/Core ---------------------------------------------------------------------------------------------------
    Mila       (S,L)    anaconda/3 (D)    go/1.13.5        miniconda/2        mujoco/1.50        python/2.7    python/3.6        python/3.8           singularity/3.0.3    singularity/3.2.1    singularity/3.5.3 (D)
    anaconda/2          go/1.12.4         go/1.14   (D)    miniconda/3 (D)    mujoco/2.0  (D)    python/3.5    python/3.7 (D)    singularity/2.6.1    singularity/3.1.1    singularity/3.4.2

------------------------------------------------------------------------------------------------- /cvmfs/config.mila.quebec/modules/Compiler -------------------------------------------------------------------------------------------------
    python/3.7/mujoco-py/2.0

--------------------------------------------------------------------------------------------------- /cvmfs/config.mila.quebec/modules/Cuda ---------------------------------------------------------------------------------------------------
    cuda/10.0/cudnn/7.3        cuda/10.0/nccl/2.4         cuda/10.1/nccl/2.4     cuda/11.0/nccl/2.7        cuda/9.0/nccl/2.4     cudatoolkit/9.0     cudatoolkit/10.1        cudnn/7.6/cuda/10.0/tensorrt/7.0
    cuda/10.0/cudnn/7.5        cuda/10.1/cudnn/7.5        cuda/10.2/cudnn/7.6    cuda/9.0/cudnn/7.3        cuda/9.2/cudnn/7.6    cudatoolkit/9.2     cudatoolkit/10.2        cudnn/7.6/cuda/10.1/tensorrt/7.0
    cuda/10.0/cudnn/7.6 (D)    cuda/10.1/cudnn/7.6 (D)    cuda/10.2/nccl/2.7     cuda/9.0/cudnn/7.5 (D)    cuda/9.2/nccl/2.4     cudatoolkit/10.0    cudatoolkit/11.0 (D)    cudnn/7.6/cuda/9.0/tensorrt/7.0

------------------------------------------------------------------------------------------------- /cvmfs/config.mila.quebec/modules/Pytorch --------------------------------------------------------------------------------------------------
    python/3.7/cuda/10.1/cudnn/7.6/pytorch/1.4.1    python/3.7/cuda/10.1/cudnn/7.6/pytorch/1.5.1 (D)    python/3.7/cuda/10.2/cudnn/7.6/pytorch/1.5.0
    python/3.7/cuda/10.1/cudnn/7.6/pytorch/1.5.0    python/3.7/cuda/10.2/cudnn/7.6/pytorch/1.4.1        python/3.7/cuda/10.2/cudnn/7.6/pytorch/1.5.1 (D)

------------------------------------------------------------------------------------------------ /cvmfs/config.mila.quebec/modules/Tensorflow ------------------------------------------------------------------------------------------------
    python/3.7/tensorflow/1.15    python/3.7/tensorflow/2.0    python/3.7/tensorflow/2.2 (D)
Modules can be loaded using the load command:
module load <module>
To search for a module or a software, use the command spider:
module spider search_term
E.g.: by default, python2 will refer to the os-shipped installation of python2.7 and python3 to python3.6.
If you want to use python3.7 you can type:
module load python3.7
Available Software
Modules are divided in 5 main sections:
Section |
Description |
|---|---|
Core |
Base interpreter and software (Python, go, etc…) |
Compiler |
Interpreter-dependent software (see the note below) |
Cuda |
Toolkits, cudnn and related libraries |
Pytorch/Tensorflow |
Pytorch/TF built with a specific Cuda/Cudnn version for Mila’s GPUs (see the related paragraph) |
Nota
Modules which are nested (../../..) usually depend on other software/module loaded alongside the main module. No need to load the dependent software, the complex naming scheme allows an automatic detection of the dependent module(s):
i.e.: Loading cudnn/7.6/cuda/9.0/tensorrt/7.0 will load cudnn/7.6 and
cuda/9.0 alongside
python/3.X is a particular dependency which can be served through
python/3.X or anaconda/3 and is not automatically loaded to let the
user pick his favorite flavor.
Default package location
Python by default uses the user site package first and packages provided by
module last to not interfere with your installation. If you want to skip
packages installed in your site-packages folder (in your /home directory), you
have to start Python with the -s flag.
To check which package is loaded at import, you can print package.__file__
to get the full path of the package.
Example:
$ module load pytorch/1.5.0
$ python -c 'import torch;print(torch.__file__)'
/home/mila/my_home/.local/lib/python3.7/site-packages/torch/__init__.py   <== package from your own site-package
Now with the -s flag:
$ module load pytorch/1.5.0
$ python -s -c 'import torch;print(torch.__file__)'
/cvmfs/ai.mila.quebec/apps/x86_64/debian/pytorch/python3.7-cuda10.1-cudnn7.6-v1.5.0/lib/python3.7/site-packages/torch/__init__.py'
On using containers
Another option for creating portable code is Using containers on clusters.
Containers are a popular approach at deploying applications by packaging a lot of the required dependencies together. The most popular tool for this is Docker, but Docker cannot be used on the Mila cluster (nor the other clusters from Digital Research Alliance of Canada).
One popular mechanism for containerisation on a computational cluster is called Singularity. This is the recommended approach for running containers on the Mila cluster. See section Singularity for more details.
Singularity
Overview
What is Singularity?
Running Docker on SLURM is a security problem (e.g. running as root, being able to mount any directory). The alternative is to use Singularity, which is a popular solution in the world of HPC.
There is a good level of compatibility between Docker and Singularity, and we can find many exaggerated claims about able to convert containers from Docker to Singularity without any friction. Oftentimes, Docker images from DockerHub are 100% compatible with Singularity, and they can indeed be used without friction, but things get messy when we try to convert our own Docker build files to Singularity recipes.
Links to official documentation
official Singularity user guide (this is the one you will use most often)
official Singularity admin guide
Overview of the steps used in practice
Most often, the process to create and use a Singularity container is:
on your Linux computer (at home or work)
select a Docker image from DockerHub (e.g. pytorch/pytorch)
make a recipe file for Singularity that starts with that DockerHub image
build the recipe file, thus creating the image file (e.g.
my-pytorch-image.sif)test your singularity container before send it over to the cluster
rsync -av my-pytorch-image.sif <login-node>:Documents/my-singularity-images
on the login node for that cluster
queue your jobs with
sbatch ...(note that your jobs will copy over the
my-pytorch-image.sifto $SLURM_TMPDIR and will then launch Singularity with that image)do something else while you wait for them to finish
queue more jobs with the same
my-pytorch-image.sif, reusing it many times over
In the following sections you will find specific examples or tips to accomplish in practice the steps highlighted above.
Nope, not on MacOS
Singularity does not work on MacOS, as of the time of this writing in 2021. Docker does not actually run on MacOS, but there Docker silently installs a virtual machine running Linux, which makes it a pleasant experience, and the user does not need to care about the details of how Docker does it.
Given its origins in HPC, Singularity does not provide that kind of seamless experience on MacOS, even though it’s technically possible to run it inside a Linux virtual machine on MacOS.
Where to build images
Building Singularity images is a rather heavy task, which can take 20 minutes if you have a lot of steps in your recipe. This makes it a bad task to run on the login nodes of our clusters, especially if it needs to be run regularly.
On the Mila cluster, we are lucky to have unrestricted internet access on the compute nodes, which means that anyone can request an interactive CPU node (no need for GPU) and build their images there without problem.
Aviso
Do not build Singularity images from scratch every time your run a
job in a large batch. This will be a colossal waste of GPU time as well as
internet bandwidth. If you setup your workflow properly (e.g. using bind
paths for your code and data), you can spend months reusing the same
Singularity image my-pytorch-image.sif.
Building the containers
Building a container is like creating a new environment except that containers are much more powerful since they are self-contained systems. With singularity, there are two ways to build containers.
The first one is by yourself, it’s like when you got a new Linux laptop and you don’t really know what you need, if you see that something is missing, you install it. Here you can get a vanilla container with Ubuntu called a sandbox, you log in and you install each packages by yourself. This procedure can take time but will allow you to understand how things work and what you need. This is recommended if you need to figure out how things will be compiled or if you want to install packages on the fly. We’ll refer to this procedure as singularity sandboxes.
The second way is more like you know what you want, so you write a list of everything you need, you send it to singularity and it will install everything for you. Those lists are called singularity recipes.
First way: Build and use a sandbox
You might ask yourself: On which machine should I build a container?
First of all, you need to choose where you’ll build your container. This operation requires memory and high cpu usage.
Aviso
Do NOT build containers on any login nodes !
If you can’t install singularity on your laptop and you don’t need apt-get, you can reserve a cpu node on the Mila cluster to build your container.
In this case, in order to avoid too much I/O over the network, you should define the singularity cache locally:
export SINGULARITY_CACHEDIR=$SLURM_TMPDIR
- If you can’t install singularity on your laptop and you **want to use
apt-get**, you can use singularity-hub to build your containers and read Recipe_section.
Download containers from the web
Hopefully, you may not need to create containers from scratch as many have been already built for the most common deep learning software. You can find most of them on dockerhub.
Go on dockerhub and select the container you want to pull.
For example, if you want to get the latest PyTorch version with GPU support (Replace runtime by devel if you need the full Cuda toolkit):
singularity pull docker://pytorch/pytorch:1.0.1-cuda10.0-cudnn7-runtime
Or the latest TensorFlow:
singularity pull docker://tensorflow/tensorflow:latest-gpu-py3
Currently the pulled image pytorch.simg or tensorflow.simg is read-only
meaning that you won’t be able to install anything on it. Starting now, PyTorch
will be taken as example. If you use TensorFlow, simply replace every
pytorch occurrences by tensorflow.
How to add or install stuff in a container
The first step is to transform your read only container
pytorch-1.0.1-cuda10.0-cudnn7-runtime.simg in a writable version that will
allow you to add packages.
Aviso
Depending on the version of singularity you are using, singularity will build a container with the extension .simg or .sif. If you’re using .sif files, replace every occurences of .simg by .sif.
Dica
If you want to use apt-get you have to put sudo ahead of the following commands
This command will create a writable image in the folder pytorch.
singularity build --sandbox pytorch pytorch-1.0.1-cuda10.0-cudnn7-runtime.simg
Then you’ll need the following command to log inside the container.
singularity shell --writable -H $HOME:/home pytorch
Once you get into the container, you can use pip and install anything you need
(Or with apt-get if you built the container with sudo).
Aviso
Singularity mounts your home folder, so if you install things into
the $HOME of your container, they will be installed in your real
$HOME!
You should install your stuff in /usr/local instead.
Creating useful directories
One of the benefits of containers is that you’ll be able to use them across different clusters. However for each cluster the datasets and experiments folder location can be different. In order to be invariant to those locations, we will create some useful mount points inside the container:
mkdir /dataset
mkdir /tmp_log
mkdir /final_log
From now, you won’t need to worry anymore when you write your code to specify
where to pick up your dataset. Your dataset will always be in /dataset
independently of the cluster you are using.
Testing
If you have some code that you want to test before finalizing your container, you have two choices. You can either log into your container and run Python code inside it with:
singularity shell --nv pytorch
Or you can execute your command directly with
singularity exec --nv pytorch Python YOUR_CODE.py
Dica
—nv allows the container to use gpus. You don’t need this if you don’t plan to use a gpu.
Aviso
Don’t forget to clear the cache of the packages you installed in the containers.
Creating a new image from the sandbox
Once everything you need is installed inside the container, you need to convert it back to a read-only singularity image with:
singularity build pytorch_final.simg pytorch
Second way: Use recipes
A singularity recipe is a file including specifics about installation software, environment variables, files to add, and container metadata. It is a starting point for designing any custom container. Instead of pulling a container and installing your packages manually, you can specify in this file the packages you want and then build your container from this file.
Here is a toy example of a singularity recipe installing some stuff:
################# Header: Define the base system you want to use ################
# Reference of the kind of base you want to use (e.g., docker, debootstrap, shub).
Bootstrap: docker
# Select the docker image you want to use (Here we choose tensorflow)
From: tensorflow/tensorflow:latest-gpu-py3

################# Section: Defining the system #################################
# Commands in the %post section are executed within the container.
%post
        echo "Installing Tools with apt-get"
        apt-get update
        apt-get install -y cmake libcupti-dev libyaml-dev wget unzip
        apt-get clean
        echo "Installing things with pip"
        pip install tqdm
        echo "Creating mount points"
        mkdir /dataset
        mkdir /tmp_log
        mkdir /final_log


# Environment variables that should be sourced at runtime.
%environment
        # use bash as default shell
        SHELL=/bin/bash
        export SHELL
A recipe file contains two parts: the header and sections. In the
header you specify which base system you want to use, it can be any docker
or singularity container. In sections, you can list the things you want to
install in the subsection post or list the environment’s variable you need
to source at each runtime in the subsection environment. For a more detailed
description, please look at the singularity documentation.
In order to build a singularity container from a singularity recipe file, you should use:
sudo singularity build <NAME_CONTAINER> <YOUR_RECIPE_FILES>
Aviso
You always need to use sudo when you build a container from a recipe. As there is no access to sudo on the cluster, a personal computer or the use singularity hub is needed to build a container
Build recipe on singularity hub
Singularity hub allows users to build containers from recipes directly on singularity-hub’s cloud meaning that you don’t need to build containers by yourself. You need to register on singularity-hub and link your singularity-hub account to your GitHub account, then:
Create a new github repository.
Add a collection on singularity-hub and select the github repository your created.
Clone the github repository on your computer.
$ git clone <url>
Write the singularity recipe and save it as a file named Singularity.
Git add Singularity, commit and push on the master branch
$ git add Singularity
$ git commit
$ git push origin master
At this point, robots from singularity-hub will build the container for you, you will be able to download your container from the website or directly with:
singularity pull shub://<github_username>/<repository_name>
Example: Recipe with OpenAI gym, MuJoCo and Miniworld
Here is an example on how you can use a singularity recipe to install complex environment such as OpenAI gym, MuJoCo and Miniworld on a PyTorch based container. In order to use MuJoCo, you’ll need to copy the key stored on the Mila cluster in /ai/apps/mujoco/license/mjkey.txt to your current directory.
#This is a dockerfile that sets up a full Gym install with test dependencies
Bootstrap: docker

# Here we ll build our container upon the pytorch container
From: pytorch/pytorch:1.0-cuda10.0-cudnn7-runtime

# Now we'll copy the mjkey file located in the current directory inside the container's root
# directory
%files
        mjkey.txt

# Then we put everything we need to install
%post
        export PATH=$PATH:/opt/conda/bin
        apt -y update && \
        apt install -y keyboard-configuration && \
        apt install -y \
        python3-dev \
        python-pyglet \
        python3-opengl \
        libhdf5-dev \
        libjpeg-dev \
        libboost-all-dev \
        libsdl2-dev \
        libosmesa6-dev \
        patchelf \
        ffmpeg \
        xvfb \
        libhdf5-dev \
        openjdk-8-jdk \
        wget \
        git \
        unzip && \
        apt clean && \
        rm -rf /var/lib/apt/lists/*
        pip install h5py

        # Download Gym and MuJoCo
        mkdir /Gym && cd /Gym
        git clone https://github.com/openai/gym.git || true && \
        mkdir /Gym/.mujoco && cd /Gym/.mujoco
        wget https://www.roboti.us/download/mjpro150_linux.zip  && \
        unzip mjpro150_linux.zip && \
        wget https://www.roboti.us/download/mujoco200_linux.zip && \
        unzip mujoco200_linux.zip && \
        mv mujoco200_linux mujoco200

        # Export global environment variables
        export MUJOCO_PY_MJKEY_PATH=/Gym/.mujoco/mjkey.txt
        export MUJOCO_PY_MUJOCO_PATH=/Gym/.mujoco/mujoco150/
        export LD_LIBRARY_PATH=$LD_LIBRARY_PATH:/Gym/.mujoco/mjpro150/bin
        export LD_LIBRARY_PATH=$LD_LIBRARY_PATH:/Gym/.mujoco/mujoco200/bin
        export LD_LIBRARY_PATH=$LD_LIBRARY_PATH:/usr/local/bin
        cp /mjkey.txt /Gym/.mujoco/mjkey.txt
        # Install Python dependencies
        wget https://raw.githubusercontent.com/openai/mujoco-py/master/requirements.txt
        pip install -r requirements.txt
        # Install Gym and MuJoCo
        cd /Gym/gym
        pip install -e '.[all]'
        # Change permission to use mujoco_py as non sudoer user
        chmod -R 777 /opt/conda/lib/python3.6/site-packages/mujoco_py/
        pip install --upgrade minerl

# Export global environment variables
%environment
        export SHELL=/bin/sh
        export MUJOCO_PY_MJKEY_PATH=/Gym/.mujoco/mjkey.txt
        export MUJOCO_PY_MUJOCO_PATH=/Gym/.mujoco/mujoco150/
        export LD_LIBRARY_PATH=$LD_LIBRARY_PATH:/Gym/.mujoco/mjpro150/bin
        export LD_LIBRARY_PATH=$LD_LIBRARY_PATH:/Gym/.mujoco/mujoco200/bin
        export LD_LIBRARY_PATH=$LD_LIBRARY_PATH:/usr/local/bin
        export PATH=/Gym/gym/.tox/py3/bin:$PATH

%runscript
        exec /bin/sh "$@"
Here is the same recipe but written for TensorFlow:
#This is a dockerfile that sets up a full Gym install with test dependencies
Bootstrap: docker

# Here we ll build our container upon the tensorflow container
From: tensorflow/tensorflow:latest-gpu-py3

# Now we'll copy the mjkey file located in the current directory inside the container's root
# directory
%files
        mjkey.txt

# Then we put everything we need to install
%post
        apt -y update && \
        apt install -y keyboard-configuration && \
        apt install -y \
        python3-setuptools \
        python3-dev \
        python-pyglet \
        python3-opengl \
        libjpeg-dev \
        libboost-all-dev \
        libsdl2-dev \
        libosmesa6-dev \
        patchelf \
        ffmpeg \
        xvfb \
        wget \
        git \
        unzip && \
        apt clean && \
        rm -rf /var/lib/apt/lists/*

        # Download Gym and MuJoCo
        mkdir /Gym && cd /Gym
        git clone https://github.com/openai/gym.git || true && \
        mkdir /Gym/.mujoco && cd /Gym/.mujoco
        wget https://www.roboti.us/download/mjpro150_linux.zip  && \
        unzip mjpro150_linux.zip && \
        wget https://www.roboti.us/download/mujoco200_linux.zip && \
        unzip mujoco200_linux.zip && \
        mv mujoco200_linux mujoco200

        # Export global environment variables
        export MUJOCO_PY_MJKEY_PATH=/Gym/.mujoco/mjkey.txt
        export MUJOCO_PY_MUJOCO_PATH=/Gym/.mujoco/mujoco150/
        export LD_LIBRARY_PATH=$LD_LIBRARY_PATH:/Gym/.mujoco/mjpro150/bin
        export LD_LIBRARY_PATH=$LD_LIBRARY_PATH:/Gym/.mujoco/mujoco200/bin
        export LD_LIBRARY_PATH=$LD_LIBRARY_PATH:/usr/local/bin
        cp /mjkey.txt /Gym/.mujoco/mjkey.txt

        # Install Python dependencies
        wget https://raw.githubusercontent.com/openai/mujoco-py/master/requirements.txt
        pip install -r requirements.txt
        # Install Gym and MuJoCo
        cd /Gym/gym
        pip install -e '.[all]'
        # Change permission to use mujoco_py as non sudoer user
        chmod -R 777 /usr/local/lib/python3.5/dist-packages/mujoco_py/

        # Then install miniworld
        cd /usr/local/
        git clone https://github.com/maximecb/gym-miniworld.git
        cd gym-miniworld
        pip install -e .

# Export global environment variables
%environment
        export SHELL=/bin/bash
        export MUJOCO_PY_MJKEY_PATH=/Gym/.mujoco/mjkey.txt
        export MUJOCO_PY_MUJOCO_PATH=/Gym/.mujoco/mujoco150/
        export LD_LIBRARY_PATH=$LD_LIBRARY_PATH:/Gym/.mujoco/mjpro150/bin
        export LD_LIBRARY_PATH=$LD_LIBRARY_PATH:/Gym/.mujoco/mujoco200/bin
        export LD_LIBRARY_PATH=$LD_LIBRARY_PATH:/usr/local/bin
        export PATH=/Gym/gym/.tox/py3/bin:$PATH

%runscript
        exec /bin/bash "$@"
Keep in mind that those environment variables are sourced at runtime and not at
build time. This is why, you should also define them in the %post section
since they are required to install MuJoCo.
Using containers on clusters
How to use containers on clusters
On every cluster with Slurm, datasets and intermediate results should go in
$SLURM_TMPDIR while the final experiment results should go in $SCRATCH.
In order to use the container you built, you need to copy it on the cluster you
want to use.
Aviso
You should always store your container in $SCRATCH !
Then reserve a node with srun/sbatch, copy the container and your dataset on the
node given by SLURM (i.e in $SLURM_TMPDIR) and execute the code
<YOUR_CODE> within the container <YOUR_CONTAINER> with:
singularity exec --nv -H $HOME:/home -B $SLURM_TMPDIR:/dataset/ -B $SLURM_TMPDIR:/tmp_log/ -B $SCRATCH:/final_log/ $SLURM_TMPDIR/<YOUR_CONTAINER> python <YOUR_CODE>
Remember that /dataset, /tmp_log and /final_log were created in the
previous section. Now each time, we’ll use singularity, we are explicitly
telling it to mount $SLURM_TMPDIR on the cluster’s node in the folder
/dataset inside the container with the option -B such that each dataset
downloaded by PyTorch in /dataset will be available in $SLURM_TMPDIR.
This will allow us to have code and scripts that are invariant to the cluster
environment. The option -H specify what will be the container’s home. For
example, if you have your code in $HOME/Project12345/Version35/ you can
specify -H $HOME/Project12345/Version35:/home, thus the container will only
have access to the code inside Version35.
If you want to run multiple commands inside the container you can use:
singularity exec --nv -H $HOME:/home -B $SLURM_TMPDIR:/dataset/ \
    -B $SLURM_TMPDIR:/tmp_log/ -B $SCRATCH:/final_log/ \
    $SLURM_TMPDIR/<YOUR_CONTAINER> bash -c 'pwd && ls && python <YOUR_CODE>'
Example: Interactive case (srun/salloc)
Once you get an interactive session with SLURM, copy <YOUR_CONTAINER> and
<YOUR_DATASET> to $SLURM_TMPDIR
# 0. Get an interactive session
$ srun --gres=gpu:1
# 1. Copy your container on the compute node
$ rsync -avz $SCRATCH/<YOUR_CONTAINER> $SLURM_TMPDIR
# 2. Copy your dataset on the compute node
$ rsync -avz $SCRATCH/<YOUR_DATASET> $SLURM_TMPDIR
Then use singularity shell to get a shell inside the container
# 3. Get a shell in your environment
$ singularity shell --nv \
        -H $HOME:/home \
        -B $SLURM_TMPDIR:/dataset/ \
        -B $SLURM_TMPDIR:/tmp_log/ \
        -B $SCRATCH:/final_log/ \
        $SLURM_TMPDIR/<YOUR_CONTAINER>
# 4. Execute your code
<Singularity_container>$ python <YOUR_CODE>
or use singularity exec to execute <YOUR_CODE>.
# 3. Execute your code
$ singularity exec --nv \
        -H $HOME:/home \
        -B $SLURM_TMPDIR:/dataset/ \
        -B $SLURM_TMPDIR:/tmp_log/ \
        -B $SCRATCH:/final_log/ \
        $SLURM_TMPDIR/<YOUR_CONTAINER> \
        python <YOUR_CODE>
You can create also the following alias to make your life easier.
alias my_env='singularity exec --nv \
        -H $HOME:/home \
        -B $SLURM_TMPDIR:/dataset/ \
        -B $SLURM_TMPDIR:/tmp_log/ \
        -B $SCRATCH:/final_log/ \
        $SLURM_TMPDIR/<YOUR_CONTAINER>'
This will allow you to run any code with:
my_env python <YOUR_CODE>
Example: sbatch case
You can also create a sbatch script:
#!/bin/bash
#SBATCH --cpus-per-task=6         # Ask for 6 CPUs
#SBATCH --gres=gpu:1              # Ask for 1 GPU
#SBATCH --mem=10G                 # Ask for 10 GB of RAM
#SBATCH --time=0:10:00            # The job will run for 10 minutes

# 1. Copy your container on the compute node
rsync -avz $SCRATCH/<YOUR_CONTAINER> $SLURM_TMPDIR
# 2. Copy your dataset on the compute node
rsync -avz $SCRATCH/<YOUR_DATASET> $SLURM_TMPDIR
# 3. Executing your code with singularity
singularity exec --nv \
        -H $HOME:/home \
        -B $SLURM_TMPDIR:/dataset/ \
        -B $SLURM_TMPDIR:/tmp_log/ \
        -B $SCRATCH:/final_log/ \
        $SLURM_TMPDIR/<YOUR_CONTAINER> \
        python "<YOUR_CODE>"
# 4. Copy whatever you want to save on $SCRATCH
rsync -avz $SLURM_TMPDIR/<to_save> $SCRATCH
Issue with PyBullet and OpenGL libraries
If you are running certain gym environments that require pyglet, you may
encounter a problem when running your singularity instance with the Nvidia
drivers using the --nv flag. This happens because the --nv flag also
provides the OpenGL libraries:
libGL.so.1 => /.singularity.d/libs/libGL.so.1
libGLX.so.0 => /.singularity.d/libs/libGLX.so.0
If you don’t experience those problems with pyglet, you probably don’t need
to address this. Otherwise, you can resolve those problems by apt-get install
-y libosmesa6-dev mesa-utils mesa-utils-extra libgl1-mesa-glx, and then making
sure that your LD_LIBRARY_PATH points to those libraries before the ones in
/.singularity.d/libs.
%environment
        # ...
        export LD_LIBRARY_PATH=/usr/lib/x86_64-linux-gnu/mesa:$LD_LIBRARY_PATH
Apuana cluster
On the Apuana cluster $SCRATCH is not yet defined, you should add the
experiment results you want to keep in /network/scratch/<u>/<username>/. In
order to use the sbatch script above and to match other cluster environment’s
names, you can define $SCRATCH as an alias for
/network/scratch/<u>/<username> with:
echo "export SCRATCH=/network/scratch/${USER:0:1}/$USER" >> ~/.bashrc
Then, you can follow the general procedure explained above.
Advanced SLURM usage and Multiple GPU jobs
Handling preemption
On the Apuana cluster, jobs can preempt one-another depending on their priority (unkillable>high>low) (See the Slurm documentation)
The default preemption mechanism is to kill and re-queue the job automatically
without any notice. To allow a different preemption mechanism, every partition
have been duplicated (i.e. have the same characteristics as their counterparts)
allowing a 120sec grace period before killing your job but don’t requeue
it automatically: those partitions are referred by the suffix: -grace
(main-grace, long-grace, main-cpu-grace, long-cpu-grace).
When using a partition with a grace period, a series of signals consisting of
first SIGCONT and SIGTERM then SIGKILL will be sent to the SLURM
job. It’s good practice to catch those signals using the Linux trap command
to properly terminate a job and save what’s necessary to restart the job. On
each cluster, you’ll be allowed a grace period before SLURM actually kills
your job (SIGKILL).
The easiest way to handle preemption is by trapping the SIGTERM signal
#SBATCH --ntasks=1
#SBATCH ....

exit_script() {
    echo "Preemption signal, saving myself"
    trap - SIGTERM # clear the trap
    # Optional: sends SIGTERM to child/sub processes
    kill -- -$$
}

trap exit_script SIGTERM

# The main script part
python3 my_script
Nota
sbatch command insideexit_script function.Packing jobs
Multiple Nodes
Data Parallel
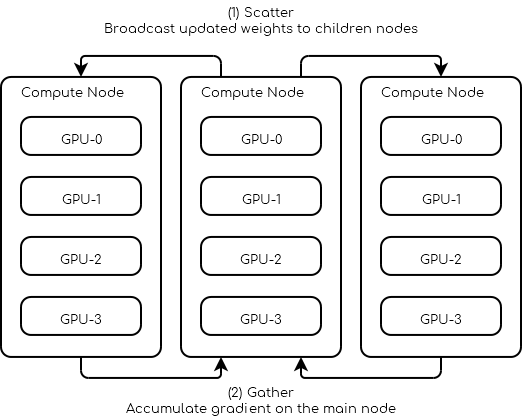
Request 3 nodes with at least 4 GPUs each.
#!/bin/bash

# Number of Nodes
#SBATCH --nodes=3

# Number of tasks. 3 (1 per node)
#SBATCH --ntasks=3

# Number of GPU per node
#SBATCH --gres=gpu:4
#SBATCH --gpus-per-node=4

# 16 CPUs per node
#SBATCH --cpus-per-gpu=4

# 16Go per nodes (4Go per GPU)
#SBATCH --mem=16G

# we need all nodes to be ready at the same time
#SBATCH --wait-all-nodes=1

# Total resources:
#   CPU: 16 * 3 = 48
#   RAM: 16 * 3 = 48 Go
#   GPU:  4 * 3 = 12

# Setup our rendez-vous point
RDV_ADDR=$(hostname)
WORLD_SIZE=$SLURM_JOB_NUM_NODES
# -----

srun -l torchrun \
    --nproc_per_node=$SLURM_GPUS_PER_NODE\
    --nnodes=$WORLD_SIZE\
    --rdzv_id=$SLURM_JOB_ID\
    --rdzv_backend=c10d\
    --rdzv_endpoint=$RDV_ADDR\
    training_script.py
You can find below a pytorch script outline on what a multi-node trainer could look like.
import os
import torch.distributed as dist

class Trainer:
    def __init__(self):
        self.local_rank = None
        self.chk_path = ...
        self.model = ...

    @property
    def device_id(self):
        return self.local_rank

    def load_checkpoint(self, path):
        self.chk_path = path
        # ...

    def should_checkpoint(self):
        # Note: only one worker saves its weights
        return self.global_rank == 0 and self.local_rank == 0

    def save_checkpoint(self):
        if self.chk_path is None:
            return

        # Save your states here
        # Note: you should save the weights of self.model not ddp_model
        # ...

    def initialize(self):
        self.global_rank = int(os.environ.get("RANK", -1))
        self.local_rank = int(os.environ.get("LOCAL_RANK", -1))

        assert self.global_rank >= 0, 'Global rank should be set (Only Rank 0 can save checkpoints)'
        assert self.local_rank >= 0, 'Local rank should be set'

        dist.init_process_group(backend="gloo|nccl")

    def sync_weights(self, resuming=False):
        if resuming:
            # in the case of resuming all workers need to load the same checkpoint
            self.load_checkpoint()

            # Wait for everybody to finish loading the checkpoint
            dist.barrier()
            return

        # Make sure all workers have the same initial weights
        # This makes the leader save his weights
        if self.should_checkpoint():
            self.save_checkpoint()

        # All workers wait for the leader to finish
        dist.barrier()

        # All followers load the leader's weights
        if not self.should_checkpoint():
            self.load_checkpoint()

        # Leader waits for the follower to load the weights
        dist.barrier()

    def dataloader(self, dataset, batch_size):
        train_sampler = ElasticDistributedSampler(dataset)
        train_loader = DataLoader(
            dataset,
            batch_size=batch_size,
            num_workers=4,
            pin_memory=True,
            sampler=train_sampler,
        )
        return train_loader

    def train_step(self):
        # Your batch processing step here
        # ...
        pass

    def train(self, dataset, batch_size):
        self.sync_weights()

        ddp_model = torch.nn.parallel.DistributedDataParallel(
            self.model,
            device_ids=[self.device_id],
            output_device=self.device_id
        )

        loader = self.dataloader(dataset, batch_size)

        for epoch in range(100):
            for batch in iter(loader):
                self.train_step(batch)

                if self.should_checkpoint():
                    self.save_checkpoint()

def main():
    trainer = Trainer()
    trainer.load_checkpoint(path)
    tainer.initialize()

    trainer.train(dataset, batch_size)
Nota
To bypass Python GIL (Global interpreter lock) pytorch spawn one process for each GPU. In the example above this means at least 12 processes are spawn, at least 4 on each node.
Frequently asked questions (FAQs)
Connection/SSH issues
I’m getting connection refused while trying to connect to a login node
Login nodes are protected against brute force attacks and might ban your IP if it detects too many connections/failures. You will be automatically unbanned after 1 hour. For any further problem, please `submit a support ticket.
Shell issues
How do I change my shell ?
By default you will be assigned /bin/bash as a shell. If you would like to
change for another one, please `submit a support ticket.
SLURM issues
How can I get an interactive shell on the cluster ?
Use salloc [--slurm_options] without any executable at the end of the
command, this will launch your default shell on an interactive session. Remember
that an interactive session is bound to the login node where you start it so you
could risk losing your job if the login node becomes unreachable.
How can I reset my cluster password ?
To reset your password, please `submit a support ticket.
Warning: your cluster password is the same as your Google Workspace account. So, after reset, you must use the new password for all your Google services.
srun: error: –mem and –mem-per-cpu are mutually exclusive
You can safely ignore this, salloc has a default memory flag in case you
don’t provide one.
How can I see where and if my jobs are running ?
Use squeue -u YOUR_USERNAME to see all your job status and locations.
To get more info on a running job, try scontrol show job #JOBID
Unable to allocate resources: Invalid account or account/partition combination specified
Chances are your account is not setup properly. You should `submit a support ticket.
How do I cancel a job?
To cancel a specific job, use
scancel #JOBIDTo cancel all your jobs (running and pending), use
scancel -u YOUR_USERNAMETo cancel all your pending jobs only, use
scancel -t PD
How can I access a node on which one of my jobs is running ?
You can ssh into a node on which you have a job running, your ssh connection
will be adopted by your job, i.e. if your job finishes your ssh connection will
be automatically terminated. In order to connect to a node, you need to have
password-less ssh either with a key present in your home or with an
ssh-agent. You can generate a key on the login node like this:
ssh-keygen (3xENTER)
cat ~/.ssh/id_rsa.pub >> ~/.ssh/authorized_keys
chmod 600 ~/.ssh/authorized_keys
chmod 700 ~/.ssh
I’m getting Permission denied (publickey) while trying to connect to a node
See previous question
Where do I put my data during a job ?
Your /home as well as the datasets are on shared file-systems, it is
recommended to copy them to the $SLURM_TMPDIR to better process them and
leverage higher-speed local drives. If you run a low priority job subject to
preemption, it’s better to save any output you want to keep on the shared file
systems, because the $SLURM_TMPDIR is deleted at the end of each job.
slurmstepd: error: Detected 1 oom-kill event(s) in step #####.batch cgroup
You exceeded the amount of memory allocated to your job, either you did not
request enough memory or you have a memory leak in your process. Try increasing
the amount of memory requested with --mem= or --mem-per-cpu=.
PyTorch issues
I randomly get INTERNAL ASSERT FAILED at "../aten/src/ATen/MapAllocator.cpp":263
You are using PyTorch 1.10.x and hitting #67864,
for which the solution is PR #72232
merged in PyTorch 1.11.x. For an immediate fix, consider the following compilable Gist:
hack.cpp.
Compile the patch to hack.so and then export LD_PRELOAD=/absolute/path/to/hack.so
before executing the Python process that import torch a broken PyTorch 1.10.
For Hydra users who are using the submitit launcher plug-in, the env_set key cannot
be used to set LD_PRELOAD in the environment as it does so too late at runtime. The
dynamic loader reads LD_PRELOAD only once and very early during the startup of any
process, before the variable can be set from inside the process. The hack must therefore
be injected using the setup key in Hydra YAML config file:
hydra:
    launcher:
        setup:
            - export LD_PRELOAD=/absolute/path/to/hack.so