Your First (and Simple) Program
(updated in 25/05/2001)
Previous | Index | Next
The best way to start your HOpenGL journey is to learn how to create the easiest thing that can be done with it: a program that doesn't make anything at all, besides opening a black window. Before we start, let's understand how the source code of a HOpenGL program is structured:
	main :: IO ()
	main = do
		Initialize GLUT
		Create a window
		Set up the main configurations of the program
		Declare callback procedures
		Indicate loop
Now we'll explain each one of the "blue items" listed above, and how to turn them into real HOpenGL code, in order to create our first program.
Initialize GLUT:
This command line concerns about the initialization of one auxiliary tool of our program, called GLUT. By now, do not worry about it. The following code will fit our purposes:
GLUT.init Nothing
Create a window:
Generally, that's the structure of a procedure that creates a window:
	createWindow Window_Name Function_To_Be_Called Configuration_List
			Window_Position
			Window_Size
The Window_Name is a String. This is the title that will appear in the top bar of our window (where else would it appear?). Let's leave it as "Hello World" by now.
When a window is created, we may wish that a function is immediately executed. This is not the case in our example, so we'll leave the field Function_To_Be_Called simply as (return ()).
The Configuration_List indicates, among other things, the type of color pallet we are going to use, and the type of window bufferization. Let's leave this field as [ Single, GLUT.Rgb ] to indicate that we are goind to use single buffering and a RGB pallet.
The way single buffering works is this one: everything you draw is directly applied to the memory area indicated by the program window. If you draw a lot of things, one after another, a very irritating "blinking effect" may be observed. On the other hand, if you use double buffering, there are two memory areas with which you work: one that is indicated by the program window (front buffer), and one that is hidden. This hidden memory area, called back buffer, is the one in which you really draw. When you call the function swapBuffers, these two buffers are swapped. This makes everything that was drawn in the back buffer to appear in the program window, and this won't cause the "blinking effect". In the following lessons I'll show you more examples and explanations.
A RGB pallet indicates that the colors we are going to use will follow the RED, GREEN and BLUE pattern. All colors are created by a composition of these three colors. The black color is created by the "total absence" of colors (0% of red, green and blue) and the white color is created by the "total presence" of colors (100% of red, green and blue). If we use the same percentage to red, green and blue, we'll obtain a color in the gray scale. A RGBA pallet contains an extra information (A or ALPHA) that indicates how opaque a color will be. This will be explained more precisely in the following lessons.
If we wished to use double buffering and a RGBA pallet, the Configuration_List would be [ GLUT.Double, GLUT.Rgba ]. But we won't do this, since we nothing is drawn in this first example.
Both the Window_Position and the Window_Size are Maybe type variables. In other words, they may not exist (so we'd use Nothing as a parameter). In our example, however, the do exist, so we'll use something like Just(parameters).
The Window_Position is measured from the top left corner of the screen, in pixels. The Window_Size is also measured in pixels. Let (100, 100) be the position of our window, and let its size be 300 pixels by 250 pixels:
			(Just (WindowPosition 100 100))
			(Just (WindowSize     300 250))
Notice that the use of WindowPosition and WindowSize before the values is necessary. Here you have all the collected code we developed for our example:
	main :: IO ()
	main = do
		GLUT.init Nothing
		createWindow "Hello World" (return ()) [ Single, GLUT.Rgb ]
				(Just (WindowPosition 100 100))
				(Just (WindowSize     300 250))
		Set up the main configurations of the program
		Declare callback procedures
		Indicate loop
Set up the main configurations of the program:
When we talk about the "main configurations of the program", we are referring to some particular characteristics we'd like our program to have just after it starts. To do this job, we'll create a function (generally called myInit) that will be called in the main function. A very used example of myInit (which we'll also use) is the following one:
	myInit :: IO ()
	myInit = do
		clearColor (Color4 0.0 0.0 0.0 0.0)
		matrixMode Projection
		loadIdentity
		ortho 0.0 1.0 0.0 1.0 (-1.0) 1.0
Do not worry about understanding eveything myInit does by now. Just keep in mind that the function clearColor sets the clearing color of the program (in this case, the black color). The last three lines refers to how we are going to "view" the objects in our 3D world (once more, this will be explained in the following lessons).
Declare callback procedures:
The use of callback procedures is one of the most powerful characteristics of (H)OpenGL. They are special functions that lead with a specific job of our program, such as the use of keyboard, mouse, joystick, time-based functions, idle functions, etc. This is the way to declare callback procedures:
	Type_Of_Callback_Procedure_1 (Callback_Procedure_1)
	Type_Of_Callback_Procedure_2 (Callback_Procedure_2)
	Type_Of_Callback_Procedure_3 (Callback_Procedure_3)
	...
Check out the following example:
	keyboardFunc (Just (keyboard))
	mouseFunc (Just (mouse))
Here, is said that a function called keyboard will be the callback procedure that manages keyboard routines, and another function, called mouse, will be the callback procedure that manages mouse routines. Both of these functions must be created by the programmer.
In this first example, we'll use a kind of callback procedure called displayFunc. It decides what our program must do when anything related to the program window happens (such as maximization, resizing or moving). When we create the window, the funcion indicated by displayFunc will also be called.
As we said before, the main purpose of this lesson is to create a program that opens an empty black window. Hence, a great function for our displayFunc callback procedure would be the display function described below (its name doesn't need to be display necessarily):
	display :: DisplayAction
	display = do
		clear [ColorBufferBit]
		flush
The command clear [ColorBufferBit] clears the buffer with the current clearing color of our program. You may remember that, in the function myInit, we said this color would be the black color. Hence, this will be the color used to "paint" the buffer, and everything that was previously drawn in it will be lost. Because we're using single buffering, a call to clear [ColorBufferBit] will be observed immediately in our window, which will be automatically painted. If we were working with double buffering, however, only the back buffer would be painted, and no difference would be observed in our program window until the buffers are swapped (via swapBuffers).
The flush function forces all previous (H)OpenGL commands to complete their execution before the program proceeds. It is very used after commands that draw or "paint" something. If you could not understand why it is useful, imagine this situation: a program (that is using double buffering) draws a lot of things in the back buffer then it swaps the buffers. If a call to flush is not done just after the draw commands, it could be the case that the buffers may be swaped before the program draws everything.
Finally, notice that the type returned by display must be DisplayAction, because it is a displayFunc callback procedure. Now we only need to declare display in the main function. This is done by the following code line:
displayFunc (display)
Indicate loop:
To validate our callback procedures, in order to execute them every time an event related to them happens, we need to declare a "loop indication". This is done by a pre-defined function called mainLoop. We only need to call it in the main function.
Now the only thing left to do is to import modules GL and GLUT. This way, our first example is finally created. Here you have the complete code:
	import GLUT
	import GL

	myInit :: IO ()
	myInit = do
		clearColor (Color4 0.0 0.0 0.0 0.0)
		matrixMode Projection
		loadIdentity
		ortho 0.0 1.0 0.0 1.0 (-1.0) 1.0

	display :: DisplayAction
	display = do
		clear [ColorBufferBit]
		flush

	main :: IO ()
	main = do
		GLUT.init Nothing
		createWindow "Hello World" (return ()) [ Single, GLUT.Rgb ]
				(Just (WindowPosition 100 100))
				(Just (WindowSize     300 250))
		myInit
		displayFunc (display)
		mainLoop
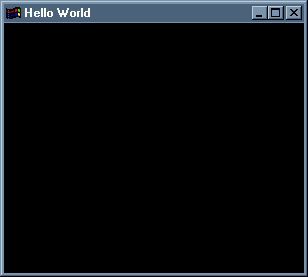
By executing this program, the following window will appear:
Now try to remove the following line from our source code:
displayFunc (display)
Execute again our program. Move the window around the screen, resize and maximize it. Can you understand what has happened?
Downloads: