
Suppose you'd like to draw something like the following picture:
Now suppose that you'd like to "mix" the above picture with the following one:

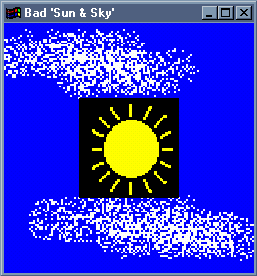
I'm sure you wouldn't enjoy the following result:
Of course, we'd like the black region of the second picture to be transparent after the "mix". In order words, we need to apply an effect called blending to control how opaque (and consequently how transparent) the colors of our program will be.
In order to create the blending effect, HOpenGL can work with a fourth color element (besides R, G and B) called alpha (or A). This way, we'll be dealing with colors in the RGBA format. If the value of this alpha element is zero, the color we'll work with is completely transparent. On the other hand, if its value is 1, the color will be completely opaque.
It is not difficult to create the blending effect. At first, we say to our program that we'd like to enable the effect. This is done by adding the following line to our code (generally in the myInit function):
enable Blend'
Now we need to indicate how our effect will be applied. We do this by using the blendFunc function. It is not a callback procedure as the ones you've learned until now. It is not declared in the main function, and the values of its parameters are already defined by HOpenGL. Observe the following code (which must also be added to the myInit function):
blendFunc SrcAlpha OneMinusSrcAlpha
It will fit our purposes by now. Do not worry about the two parameters of this function (whose values are, in this example, SrcAlpha and OneMinusSrcAlpha). The first one concerns about how the components R, G, B and A from the origin color will behave after the blending. The second one concerns about the same thing to the destiny color. If you'd like more information on this, read the description of this function in the Microsoft Documentation.
The last thing to be done is to declare our current color with 4 elements, rather than 3. Check out the difference:
		color (Color3 1.0 1.0 1.0 :: Color3 GLfloat)
		color (Color4 1.0 1.0 1.0 0.5 :: Color4 GLfloat)
This fourth element in the second command is exactly the alpha component, which indicates how opaque/transparent a color is.
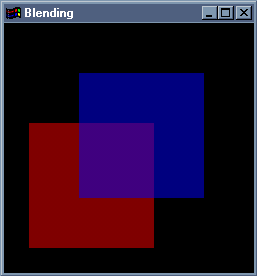
In the following code, two squares are drawn: one is red and the other is blue. The color of the intersection of them is a mix of these two colors:
	import GLUT
	import GL

	display :: DisplayAction
	display = do
		clear [ ColorBufferBit ]
		color (Color4 1.0 0.0 0.0 0.5 :: Color4 GLfloat)
   		beginEnd Quads $ mapM_ vertex [
			Vertex2 0.10  0.10,
			Vertex2 0.60  0.10,
			Vertex2 0.60  0.60,
			Vertex2 0.10 (0.60 :: GLfloat)]
		color (Color4 0.0 0.0 1.0 0.5 :: Color4 GLfloat)
   		beginEnd Quads $ mapM_ vertex [
			Vertex2 0.30  0.30,
			Vertex2 0.80  0.30,
			Vertex2 0.80  0.80,
			Vertex2 0.30 (0.80 :: GLfloat)]
		flush
		swapBuffers

	myInit :: IO ()
	myInit = do
		clearColor (Color4 0 0 0 0)
		clear[ColorBufferBit]
		enable Blend'
   		blendFunc SrcAlpha OneMinusSrcAlpha
   		matrixMode Projection
   		loadIdentity
   		ortho 0.0 1.0 0.0 1.0 (-1.0) 1.0

	main :: IO ()
	main = do
   		GLUT.init Nothing
   		createWindow "Blending" (return ()) [ GLUT.Double, GLUT.Rgb ]
                	(Just (WindowPosition 100 100))
                	(Just (WindowSize     250 250))
   		myInit
   		displayFunc display
   		mainLoop
The result is the following one (be sure to adjust the brightness/contrast of your monitor in order to see the picture correctly):
To understand how to make just a region of a picture transparent, as in the introductory example of this lesson, you'll need to learn how to draw this kind of pictures. Of course, it can be done pixel by pixel, but this would be a tedious work. A better solution would be to copy the picture from a bitmap file (.BMP). You'll learn how to do this in the following lessons.
The blendFunc function is defined in module GL_PerFragment, which is automatically imported if your program already imports module GL.