Ajmlc: The First RAC compiler with Client Verification Capability
Henrique Rebêlo, Ricardo Lima, Gary T. Leavens
Motivation
The current implementation of the JML (RAC) compiler does not catch some contract violations
that are detectable by the static checker ESC/Java2 and now by ajmlc (since version 2.1).
Since the precondition that is checked on a method call is based on the method dynamic's
type [2]. For example, an error can be introduced if the precondition declared for the static type
is violated whereas the dynamic type's when weaken such a precondition is not. In this case the current
jml compiler [2] does not catch such a precondition violation, whereas the static checker ESC/Java2 does detect.
Leavens and Müller [1] discuss that to enable sound modular reasoning, certain specifications must be visible to
clients. "Preconditions of methods lead to proof obligations for clients (i.e., callers) of the method, but clients
cannot be required to satisfy hidden preconditions. [1]" This way, during a method call, only the visible preconditions of
visible specification cases (and cannot use non-visible cases) must be established. Hence the effective precondition for a client is the
disjunction of the preconditions in the specification cases visible to that client. If none are visible, the effective precondition is true.
In this scenario, there is another problem with the JML (RAC) compiler: A check at the point of calling the method's precondition with visible
specifications has been left out of the tool. In other words, a client compiled with the classical JML compiler tries to enforce all preconditions
even if they are not visible to their clients. By using the new JML compiler that uses aspect-orientation, ajmlc, we can mitigate the two discussed problems:
(1) we are able to check JML features in both client and server sides, and (2) when checking on client side, the ajmlc compiler take into account which visbible specifications to check.
It is important to note that all of the code in a running system could not be compiled with RAC enabled. In this case, it is of
value to still have for example the precondition checked as it is today (in the server side). With the new JML compiler, ajmlc (since version 2.1), we can have JML specifications
checked in both client and server side or only in the server or client side.
The goals of the ajml tool with call site verification are
- to check, compile, and run Java programs annotated with JML
- to support client side verification, which is not possible with standard jmlc compiler
- to check only visible specications (when using call site verification), which is not possible with standard jmlc compiler.
- to check visible specifications at call site using customized exceptions (improved exception detection and handling of JML features).
Getting Started
After you have successfully downloaded AJML tools, you are ready to start using it. Follow the following steps to get started with AJML.
1) Unpacking the zip file
Unpack the zip file in a folder which its path is
c:\JMLAfter unpack, you see
c:\JML\AJML-2.4Note that you can unpack in another folder, but if you want to keep the default configuration of the .bat files, which are part of the AJML release, you should keep the standard folder.
2) Running the tools
To run the ajml checker, from a command prompt, execute
ajml file1.java file2.jml
To use the AspectJ runtime assertion checker compiler, use the ajmlc .bat script, for example:
ajmlc file1.java
Note that the default weaver (AspectJ compiler) of ajmlc is the ajc, if you want to compile JML features using another weaver, use the following:
ajmlc -aspectJCompiler "abc" file1.java
To use the AspectJ runtime assertion checker compiler with both client and server side verification, use the ajmlc .bat script, for example:
ajmlc file1.java -callSiteInstrumentation
To use the AspectJ runtime assertion checker compiler with only client side verification, use the ajmlc .bat script, for example:
ajmlc file1.java -onlyCallSiteInstrumentation
3) Running programs compiled with ajmlc
To run Java programs where some (or all) of the class files have been compiled with the AJML compiler (ajmlc), you will need to have the classes compiled in your Java "CLASSPATH". However, just having these classes in your "CLASSPATH" is not enough.
In addition to the compiled class files, you have to run a ajmlc-compiled program with AJML/bin/ajmlrt2.4.jar in your "CLASSPATH".
There is a .bat file for doing all of this easily. This script is called "ajmlrac". You would use it instead of the normal Java virtual machine ("java" command), as follows:
ajmlrac my.package.name.ClassnameOfMain
where "ClassnameOfMain" is the class name of the class containing your program's main method, and "my.package.name" stands for the name of the package where "ClassnameOfMain" is found.
Getting Started using Eclipse
After you have successfully downloaded AJML tools, you are ready to start using it. Follow the following steps to get started with AJML within Eclipse platform.
Warning: this is not an Eclipse-based plugin for ajmlc. However, you can easily use ajmlc
within Eclipse by using a custom Ant task, which is a part of the AJML release.
1) Demo Project
- Download the project DemoCallSiteVerification
- Create a simple Java project into Eclipse using the DemoCallSiteVerification project
2) Copying the AJML stuff
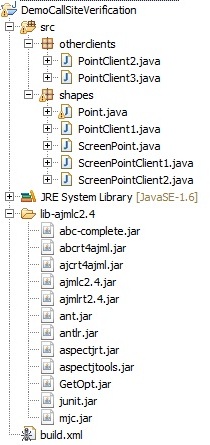
After you have successfully downloaded AJML tools, you should copy the jar files inside the "bin" folder and all AJML libraries contained into "ajml-lib" folder to a new folder named "lib-ajmlc2.4" within your DemoCallSiteVerification project. Afterwards, your project structure should look like as the figure below:
3) Compiling and Running the Demo program with AJML
To compile and run the Demo program using AJML, you need only to set some properties in "build.xml" file (you can see such a file in the project structure depicted above). (see details in the figure below).
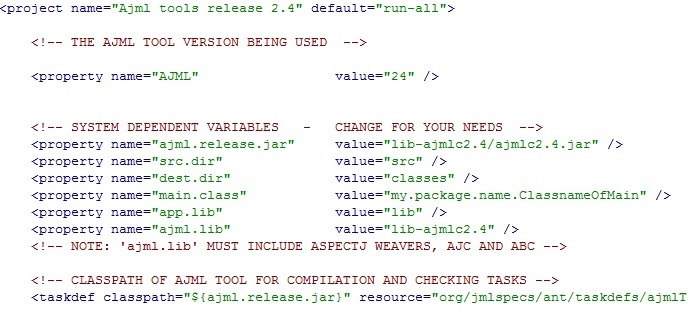
In order to enable the client side verification, you should set on of the options illustrated in the figure below. If both options are false, the ajmlc only performs server side verification. If the first one (callsiteinstrumentation) is enabled to true, then the ajmlc performs both client and server side verification. To perform just client side verification, the second option illustrated (onlycallsiteinstrumentation) must be set to true (as in the figure below).

In addition, you can see the AJML tasks in the ANT editor. First of all, open the ANT view in Eclipse as following:
Window -> Show View -> Ant
Then in order to view the ant tasks provided by the "build.xml" file, you should drag and drop it in this view. Afterwards, you will see the main tasks as illustrated in figure below.
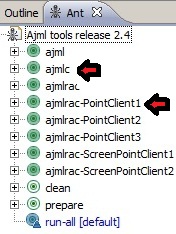
Now you are able to run AJML tools using ANT task. Click twice in the "ajmlc" task and then twice in the customized "ajmlrac" task (e.g., ajmlrac-PointClient1). We create customized tasks to run each client in this demo project. The results is illustrated in figure below

Note: each client presented in the above buiding file, presents a specific result due to its visibility rules, even if the call is the same for all of them.
References
- Gary T. Leavens and Peter Müller. Information Hiding and Visibility in Interface Specifications. Proceeding of the 29th International Conference on Software Engineering (ICSE 2007), Minneapolis, MN, May 19-27, 2007, pages 385-395.
- Yoonsik Cheon and Gary T. Leavens. A Runtime Assertion Checker for the Java Modeling Language (JML). In Hamid R. Arabnia and Youngsong Mun (eds.), International Conference on Software Engineering Research and Practice (SERP '02), Las Vegas, Nevada. CSREA Press, June 2002, pages 322-328.